You have a paragraph highlighted in a browser and you want to keep it. Not paste it into something right now: keep it, somewhere you can find it next week, with some record of where it came from.
macOS gives you three routes for that, and they are worth telling apart.
- The Services menu, which any app with selectable text can offer, and which you can put on a keyboard shortcut of your choosing.
- A shortcut built in Shortcuts.app and published as a Quick Action, which is the Services route with a visual editor on top of it.
- An app with a global hotkey that reads the selection itself, which is the fastest of the three and the one that needs the Accessibility permission.
The clipboard is not on that list. The rest of this piece covers why, what each route can actually read out of another application, and what to do when an app refuses to hand its selection over.
Why the clipboard is the wrong tool for keeping something
The clipboard is a courier, not a shelf. Three things follow from that, and all three bite.
It holds one item. The general pasteboard on macOS is a single slot. The moment you copy anything else, the thing you were holding is gone, and there is no system-level undo for it. If you are collecting four quotes from an article, the clipboard can carry the fourth one and no others.
It is overwritten by accident. Copying is reflexive. You copy a URL to send to somebody, you copy a command to run it, and each of those quietly discards whatever you were carrying. A clipboard manager fixes the history problem, and it is a genuinely good thing to run, but it fixes only the first two problems.
It carries no context. A pasteboard item is text and, at best, a few alternate representations of the same text: rich text, HTML, a plain string. It does not record which application produced it, which document was open, which page you were on, or when. That information exists at the moment you press ⌘C, and the clipboard discards all of it. A week later you are looking at four sentences with no idea which of them came from the vendor's documentation and which came from a forum post.
So the clipboard works perfectly when the gap between copy and paste is a few seconds. For anything you intend to keep, you want a route that writes the text down somewhere durable and records where it came from.
Route one: the Services menu
Services are one of the oldest good ideas in macOS and one of the least used. A Service is a small piece of functionality that one app publishes and every other app can call with the current selection. Select text anywhere, right-click, and the Services submenu at the bottom of the context menu lists what will accept it. The same list lives in the application menu next to About and Preferences.
The list is not fixed. macOS filters it by what the front application says it can provide: if the app advertises plain text, the text services appear; if you have a file selected in Finder, the file services appear instead. That filtering is why the Services menu looks different in every app, and why it sometimes looks empty.
Giving a Service a keyboard shortcut
A Service you have to hunt for in a context menu is barely faster than copy and paste. The point is the shortcut.
- Open System Settings.
- Go to Keyboard, then the Keyboard Shortcuts button.
- Choose Services in the list on the left.
- Find your Service, tick it so it is enabled, then click to the right of its name and press the chord you want.
Apple has moved this panel between releases, so if it is not where you expect it, type "Services" into the search field at the top of System Settings and it will take you there.
Two notes on choosing the chord. Pick something with at least two modifiers, because a single-modifier chord almost certainly belongs to some application already. And check it afterwards in the app you will use it in most, since an app-level shortcut wins over a Services shortcut in some cases and you want to find that out now rather than mid-sentence.
When the Service does not appear
If your Service is missing from the menu, work through this in order.
- Confirm the selection is really text. A selection inside a canvas, a PDF viewer that has no text layer, or an image does not count.
- Confirm the Service is ticked in that Keyboard Shortcuts list. Newly installed services often arrive switched off.
- Quit and reopen the app you are selecting in. The Services list is read when an app starts, so an app that was already running when you installed something may not have noticed it.
- Log out and back in if it still refuses. That reliably rebuilds the system's cache of registered services.
Route two: Shortcuts and Quick Actions
Shortcuts.app can publish a shortcut into the same Services menu, which means you can build the behaviour you want without writing any code.
Make a new shortcut, then open its details pane and turn on Use as Quick Action with the Services Menu destination. The shortcut now receives whatever is selected as its Shortcut Input, and you can set the accepted input type to text so it only offers itself where text is selected. From there the shortcut does what you tell it: append the text to a file, add it to a note, run a script over it, or push it somewhere else entirely.
Because it lands in the Services menu, everything in the section above applies. You give it a keyboard shortcut in the same place, and it appears in the same right-click submenu. Shortcuts also lets you attach a keyboard shortcut from inside its own details pane, which is the same mechanism reached from a different door.
The honest trade with this route is latency and fragility. A shortcut has to launch its runner, walk your actions, and hand off to whatever you pointed it at, so there is a beat between the keystroke and the result. It is an excellent route when the work is transformation, for example cleaning up the text or filing it by rules. It is a middling route when all you want is for the sentence to be kept, instantly, hundreds of times a day.
Route three: a global hotkey, and what it can actually read
This is the route that confuses people, so it is worth being precise.
Registering a global hotkey is easy and grants nothing. A system-wide hotkey means one thing: when that chord is pressed, your application is told, no matter which app is in front. It does not come with the selection. It does not come with the text under the cursor. It is a doorbell, not a delivery.
To turn that keystroke into text, an app has two options.
Ask the Accessibility API. macOS exposes a tree of user interface elements for every running app, the same tree VoiceOver uses. An app can ask the system which element has focus and then ask that element for its selected text. When it works, it is clean: nothing is simulated, the clipboard is untouched, and the answer arrives immediately.
Simulate a copy. The app synthesises ⌘C, waits, and reads the pasteboard. This works nearly everywhere, because nearly everything supports copy. It also destroys whatever was on your clipboard, and it depends on a timing guess about how long the other app takes to answer.
The Accessibility permission, and why it is needed
The first option requires that your app be listed under System Settings, Privacy & Security, Accessibility. That permission exists precisely because reading another application's interface is powerful: the same API that can read your selection can read anything else on screen and can drive the interface too. macOS will not let an app do that quietly, so it puts the grant in one list, where you can see every app that holds it and revoke any of them.
Two things follow that are worth knowing before you judge an app for asking.
- The permission is all or nothing. There is no "may read selections only" grant. This is a macOS design decision, not an app's choice, so the question to ask is whether you trust the app, not whether it could have asked for less.
- An app distributed through the Mac App Store runs in the sandbox, and the sandbox does not permit this API at all. That is why several capture tools ship their App Store build with the Services route instead. It is not a missing feature; it is a different distribution rule.
When an app refuses to expose its selection
Some apps do not answer the Accessibility API honestly for text. Cross-platform frameworks that draw their own text, remote desktop sessions, some terminal emulators, and the occasional app that simply never implemented the text attributes will all report a focused element with no selected text in it, even though you can plainly see the highlight.
There is no trick that fixes this from the outside. What you do instead:
- Use the Services route in that one app. Services do not go through the Accessibility tree. The app hands the selection to the system deliberately, which is why a right-click Service works in places a hotkey cannot reach.
- Fall back to copy and paste. Slower, but it uses the same path the app already supports.
- Check whether the app has its own export or share action. Many editors will send a selection somewhere directly and skip the whole question.
A capture tool that is honest about this will tell you which of the three happened, rather than silently doing nothing. The failure cases are genuinely different: the app you are in is the capture app itself, nothing is focused at all, or the app will not expose the selection. Each of those deserves a different next move from you.
The three routes side by side
| Clipboard | Services menu | Global capture hotkey | |
|---|---|---|---|
| How many things it holds | One, until the next copy | One per invocation, stored by whatever receives it | Every capture, kept |
| Keeps where the text came from | No | Only if the receiving app records it | Yes, if the app records source and time |
| Do you have to switch apps | To paste it, yes | No, but you leave the keyboard for the menu unless you assign a chord | No |
| Extra permission needed | None | None | Accessibility |
| Works where the selection is hidden from the system | Yes | Yes | No, use the Services item |
What "with its source attached" actually buys you
Provenance sounds like bookkeeping until the first time you need it.
A month after you kept a sentence, the sentence alone is often not enough. You need to know whether it came from official documentation or from somebody's blog, because one of those you can act on and the other you should verify. You need to reopen the page it came from, because the paragraph after it has the part you now need. You need to tell two nearly identical error messages apart, because one came from the staging box and one from production.
The useful fields are few: the application, the document or page title, the address if there was one, and the moment it happened. All of them exist at the instant you capture and none of them survive a plain copy. Recording them costs you nothing at the time, and it is the difference between a pile of orphan text and something you can reason about later.
There is a design question underneath, too: whether that source information is written into the text of your note or stored beside it. Written in, it clutters every quote and you end up deleting it by hand. Stored beside it, the note reads as you wrote it and the source is there when you ask for it.
How HushNotes does this
HushNotes takes the third route, with the first as its fallback.
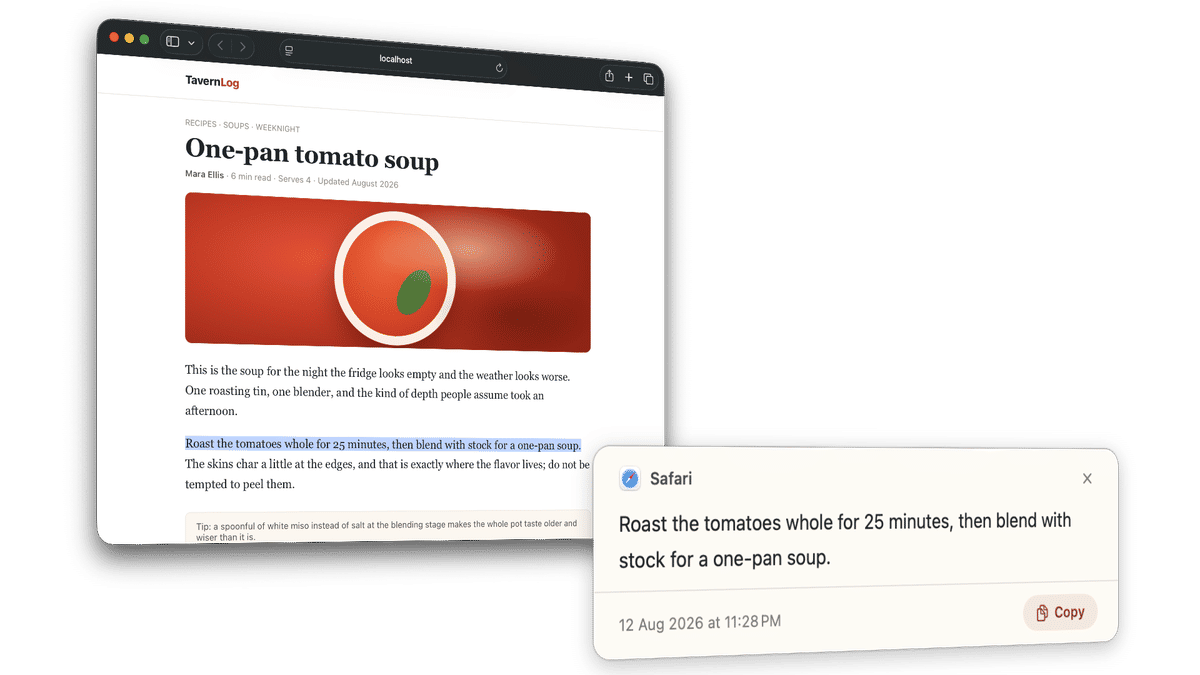
Select text in any app and press ⌥⇧Space. The text appends to the note you have open. If no note is open, the capture stands on its own in the Shelf, filed under the day it happened. Hold ⌘ as you capture and it becomes a new note instead. A small capsule confirms the capture and offers Undo for a moment, and nothing else appears on screen, so you stay in the app you were reading.
The source is stored next to the capture rather than pasted into it: the application name, its bundle identifier, the page address, and the window or page title. That is a toggle, on by default, and it is stored rather than written into your text. The Shelf's Captures lens shows each clip wearing the icon of the app it came from.
When an app will not expose its selection, the Capture in HushNotes item in the right-click Services menu does the same job, and it ships in every build. Captures are written to disk on your Mac, so the whole thing works with the wifi off.
If you want to see the rest of it, the instant capture page walks through the behaviour with real screenshots, and /compare/ puts it next to the other options.
Was $14.99 now $9.99, pay once · macOS 14 or later